You’ve got the boat (or a buddy with one), you’ve got a board, and now… you’ve got a GoPro so you can capture some footy! Now, all you have to do is determine what accessories, if any, you need to mount your GoPro for the best shots annnnnnnnnd welcome to the wormhole of GoPro accessories, mounting placement, and settings. We’re WSM and we will be your tour guide!
First up, the floaty.

For the love of anything beautiful in this world, GET A FLOATY FOR YOUR GOPRO. This should be top priority, seriously. That little brick of processors and lenses would love nothing more than to sink to the bottom of the lake and get a great shot of you fading into darkness while sobbing. Straight up, for any watersports, get a floaty. HOWEVER, keep in mind that any accessories you attach to your beautiful new bundle of joy will add weight. Therefore, the buoyancy of the floaty will vary depending on what you have attached to it. We suggest testing your floaty out in a pool or bathtub with the accessories attached to it to see how well it floats BEFORE shredding the gnar on the lake.
Next up, the mounts.
This is where the GoPro wormhole goes into overdrive. Ludacris speed, if you will. Rather than talk about all of the options out there, we’ll discuss what we at WSM use.
– Standard adhesive mounts that come with the GoPro

We have 5 or 6 of these stuck to our boat and have had pretty great results. They typically come in two options, flat and curved, both of which are useful. Also, we’ve removed them from our previous boats and our gelcoat was left unscathed. HOWEVER, this may have only been our experience, so use them at your own risk.
– The Good: Cheap, come with your GoPro, can almost be stuck anywhere.
– The Bad: Basically permanent mounting, no adjustability, always visible on your boat (little black dot).
– Suction Cup Mounts

For those of you who want an option that doesn’t involve sticking your prized possession to your other prized possession in a semi-permanent fashion, there’s the suction cup mount. These are particularly helpful since you can move them around as needed and stick them almost anywhere that has a flat surface.
– The Good: Versatility, mobility.
– The Bad: Required to be stuck to a flat surface, can pop off easier than a sticky mount, may show wiggling video in rough water conditions.
– Chest Strap Mounts

We’ve used these with moderate success. They’re fine for a different perspective, but boy, you sure do wiggle a lot when you surf and unless you’re throwing crazy tricks you may end up just recording your feet as you stand there or people in the boat the entire time (depending on the angle).
– The good: New perspective to break up the same ‘ol footage.
– The bad: The harness can move around when you fall, video can be shaky.
– Selfie sticks:

These are the most hit or miss type of accessories. It turns out holding a stick with a camera on the end while surfing can be a little tricky. Who knew, right? Since it’s tricky, it can lead to crazy all-over-the-place footage, especially if you’re one of those “arm swinging” kind of surfers. Sort of like the chest harness, it’s great for a new perspective, but it comes with a cost of reliability/stability. Another option is to give the stick to a passenger and let them track you from side to side while filming you.
– The good: New perspective, can take awesome shots if done well.
– The bad: Shaky like crazy, distracting to hold while riding.
Next up on our tour through the wormhole is mounting placement.
This can actually be a little trickier than you might think. Of course you can slap an adhesive mount on the boat somewhere in the back and hit record, and that does work, but the actual placement of the mount can be the difference in you getting the shot and totally missing it. Let’s run through a few of the most common mounting placements.
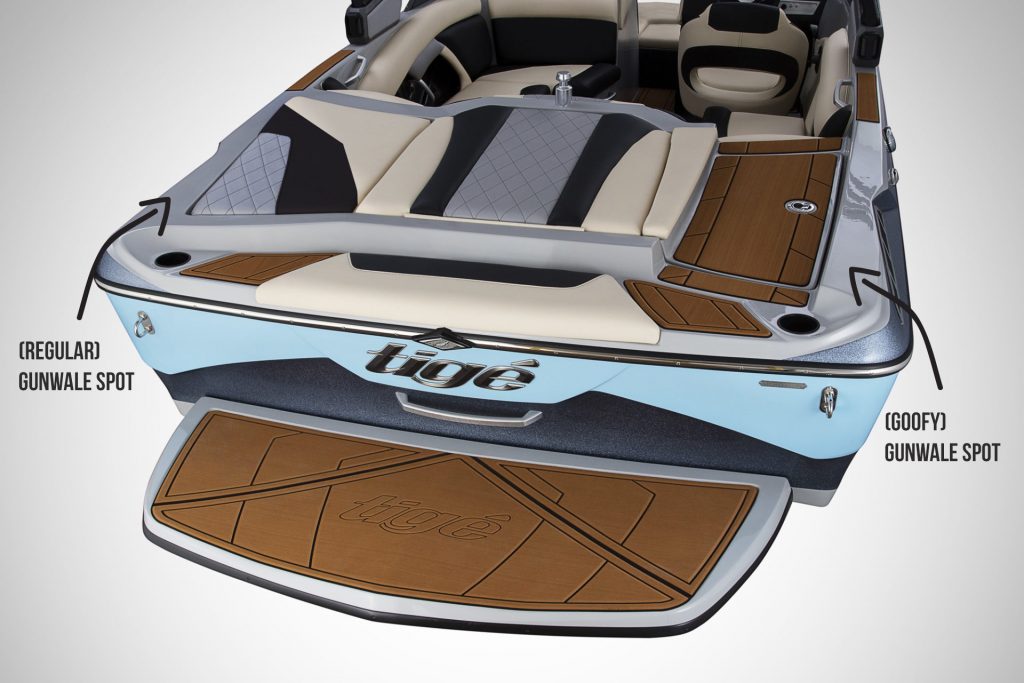
The rear gunwales.
This area is probably where most people go to first when using and for good reason. They’re typically a flat level surface, close to the rider, offer great stability, and have a good angle on the rider. You can typically use either adhesive mounts or a suction cup mount depending on the surface, so this spot can actually be pretty versatile. IMPORTANT, make sure the rope stays clear of the GoPro. If the rope is resting on the camera, accessory, or housing and the tension goes tight, the rope will win and your GoPro might take flight.
– The Good: Easy, quick access to the camera, good angle, close to the rider.
– The Bad: Can come off if the rope hits it.

The transom.
This area can offer some of the best shots for airs. Videoing is all about angles and the low placement of the camera can offer a great view of the rider and the distance between their board and the wave. However, the great angle comes at a cost. This is one of the easiest locations for water drops to get on the camera causing an obstructed view of the rider. Nothing is worse than reviewing the footage of your first ever [insert trick name here] only to watch the footage and see that a water spot completely ruined it.
– The Good: Super close to the rider, low angle is great for airs.
– The Bad: Water spots galore.
![]()

The tower.
This is one of those take it or leave it placements. Tower shapes and surfaces are all different so some work and some don’t. Since GoPros use a wide angle/fisheye lens, they’re notorious for having depth perception issues. What’s close seems far and what’s far seems miles away. So, when using a roll bar mount, adhesive mount, or suction cup mount for your tower, we suggest using the “medium” setting vs the “wide” setting. This will eliminate most of the fisheye effect and also zoom in just a touch.
– The Good: Cool angle, shows people in the boat, camera is out of the way.
– The Bad: The rider can seem far away, the wave can look small, it shows everyone how dirty the inside of the boat is (don’t act like you don’t have life jackets thrown all over the place.)
The nerdy stuff, GoPro Settings.
Here’s the thing to keep in mind about video settings on your GoPro. The higher the number in the settings, the more space it’ll take up on the micro SD card and the more battery it’ll eat up. That goes for basically everything, resolution, fps… etc. High resolutions and FPS are nothing to be scared of, but bring an extra battery and micro SD card just in case. Here are our basic recommendations for camera settings based on the eventual endpoint of the video.
Instagram/Facebook: WSM Suggestion – 1920 x 1080 @ 120fps.
Instagram is a weird one. We love it, clearly, but their video formatting and sizing is a little weird. As of this moment (June 2018) no matter what resolution your GoPro is set to, Instagram will resize it to fit their needs. The “square” format of Instagram is typically 1080 x 1080 (1:1 ratio), the “letterbox” format can essentially be treated as 1920 x 1080 (16:9 ratio), and the FPS is a guess at 30 fps (technically 29.97). Facebook is a little less weird and supports higher resolutions than Instagram, but also has its fair share of limits that we don’t even want to go into. So, what does that mean for the 4k or 1080 at 240fps settings on your GoPro? Meh, we wouldn’t use it for these two platforms, plus it should help you avoid the ever confusing “cinematic” codec that GoPro uses at those resolutions. 1920 x 1080 at 120fps should give you plenty of resolution and FPS for those awesome slow-mo vids for IG and Facebook. Gram it up, brah.
YouTube: Whatever you want, but weigh the pros and cons before choosing.
Do you have a computer that can support the “cinematic” codec well? Awesome! Load up 4k @ 60fps and/or 1080 @ 240fps and get after it Spielberg! For the rest of y’all, or maybe if you have no idea what a codec is, we’ll go out on a limb and say your machine may not be able to view/edit the footage… or at least not well. For those folks, we’ll revert back to 1920 x 1080 @ 120 fps. Again, 1920 x 1080 should be plenty of resolution for normal circumstances on YouTube. Especially when you consider the fact that mobile users may not have a 4k compatible smartphone or tablet.